Follow along as we put our skills up against some of the best restaurants in Chicago (and beyond).

Sunday, April 1, 2012

Homemade Cheese...Harder Than You Think

We're pretty sure that we've mentioned cheese many, many, many times throughout this blog. So it is to no surprise that we would eventually find the opportunity to delve into the art of CHEESEMAKING. Thanks to Matt's sister Jenny, for Christmas she got Matt his very own mozzarella cheese making kit from Roaring Brook Dairy. You can only imagine how excited Matt was at the prospect of making cheese at home.

Seeing as we gave up meat for Lent this year, we have had to be VERY creative when cooking for every day meals and especially for special occasions. I hate to admit this, but we have an annual WRESTLEMANIA watch (yes it is true, and it's glorious - go ROCK 2012  [clearly this is Matt speaking]). So this year, with our lack of meat, Matt decided to break open into the Roaring Brook Dairy kit and make homemade mozzarella for a variety of mozzarella based appetizers and salads.

You may not think it, but making homemade cheese is MUCH harder than the directions made it seem (their tagline of "homemade mozzarella in under an hour" is a bit of a reach - maybe after you've done it a few times). A couple of lessons learned:

- Cheese curds (the real ones not the fried ones) are very delicate. Do not over stir the curds, Do not stir the curds too forcefully.

- Temperature is important. Overheating the milk can cause the curds to disintegrate and then its very hard to separate them from the whey.

- Although organic milk would seem to be best, we had a better product when using regular milk (i.e. Dean's), but this was our second try.

- Chicago tap water is not conducive for cheesemaking. Make sure to use filtered or bottled water for dissolving citric acid and rennet tablet.


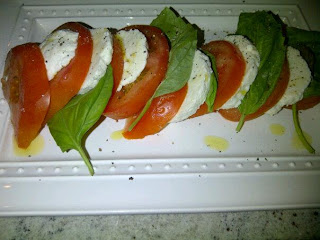
After 2 batches we ended up with some pretty good mozzarella cheese (pictured below). We definitely plan to make another batch soon as we continue to hone our cheesemaking skills. We may even be selling batches soon so keep your eye out for that, or go for our favorite store brands, BelGioioso or the local fresh stuff from our local Italian deli, Bari. Also we recently had some really good mozzarella dishes at a new local Chicago hot spot, RPM Italian. Any way you have it, be sure to keep mozzarella a cornerstone of a cheese filled diet. Happy eating.

Homemade Mozzarella (4.1.12)
Caprese Salad with Homemade Mozzarella

Sunday, March 18, 2012

Carrot and Avocado Salad

A few weeks ago, after Matt had won an award from McDonald's, we decided to celebrate by heading to a Chicago landmark that recently re-opened. We went to the Pump Room, a notorious Chicago spot which was famous as a bar, and hosted the likes of Frank Sinatra (in fact our table was right next to their big booth dedicated to Old Blue Eyes). We decided to go for the prohibition style cocktails, but when we got their, we realized they had updated their restaurant with a new, modern decor. So, we decided to try their dinner service as well.


As an aside, for Lent this year we gave up all meat (beef, chicken, pork, everything), so going out to dinners has been quite an experience for us lately, as we are very carnivorous people. We asked our server for some vegetarian favorites on the menu and she recommended the Roast Carrot and Avocado Salad. She told us that although it sounded weird/was not a normal pairing, that it was one of their best selling dishes. We ordered it and to our surprise it was DELICIOUS.


After the dinner, Michele was determined to find a recipe to recreate this dish at home. To our surprise, we actually were able to find Jean-Georges Vongerichten recipe for this dish. To find the complete recipe visit http://well.blogs.nytimes.com/2011/11/02/home-cooking-with-jean-georges/. We highly recommend this salad and here is a picture of our homemade version for comparison. ENJOY!

Sunday, February 26, 2012

The Academy Awards, Restaurant Week and More!!!

Since we moved in together in 2008, one of our annual traditions has been a private feast for 2 on the night of the Academy Awards. In addition to some competitive betting, we make a ton of food, usually an intense appetizer buffet. Every year we have something that makes the night memorable (i.e. 2009's exploding champagne incident). This year we added a twist that we wanted dishes that would be representative of some of the Best Picture nominees. Here's the 2012 Casa de Cahill Academy Awards Menu:


Midnight in Paris: Hemingway Cocktail
The Artist/Hugo: Baked Brie (recipe from Ina Garten courtesy of Food Network) with a selection of crackers, apples and pears
The Descendants: Shrimp Cocktail
The Help: Classic Macaroni and Cheese (recipe from America's Test Kitchen)
Moneyball: Adult Snickers (see below for details)

One of our Academy Award dishes was inspired by a recent trip to Vie, a Michelin one-star, in Western Springs, IL which we went to for Chicago's Restaurant Week. Matt has been to Vie before for numerous work functions (since he works out in the burbs) and he couldn't wait for me to try it. Well...it certainly was amazing and we both highly recommend venturing out to try it. Every dish was great (some of our favorites included the bone marrow, crispy pork belly and the roasted whitefish) but one of the desserts was just amazeballs...valrhona chocolate mousse bar, soft caramel, salted peanuts (see above right).

Seeing as we don't typically challenge desserts on this blog, we were a bit hesitant at first but when we were still looking for something to represent Moneyball in our Academy Awards lineup, this seemed like a natural fit and a great take on an "adult" version of a snickers bar. So we took on the challenge.

We found recipes for three layers to this dessert bar: base, caramel sauce, and chocolate mousse. First prepare the base and allow to set (at least an hour), then prepare and layer the caramel sauce (the caramel sauce can be made a few days in advance), and finally prepare the mousse and layer and allow to set. Once all layers have been added allow to set in the fridge for a few hours before serving.

While the flavors were delicious, we still have a ways to go on our pastry presentation skills. We really enjoyed our version but the Vie version is more refined and was more surprising when we had it for the first time so this time the restaurant wins. That being said we have plenty of leftovers of everything so the week ahead will be a tasty one.


Sunday, January 29, 2012

The...Lobster...Roll

We've always been fans of seafood. Our typical seafood night hits on the basics; shrimp, oysters, crab, etc. Our favorite oyster bar for a long time has been Shaw's Crab House in Chicago but recently we have grown very fond of GT Fish & Oyster on Grand, just a few minutes from our house.


On a recent visit to GT Fish & Oyster among many good dishes, one stood out as THE BEST....The Lobster Roll. We have always thought of lobster as the pinnacle of the seafood genre...the most decadent...the most upscale...the most delicious. And we have had it MANY different ways. In fact during our honeymoon, one of our most memorable moments was a whole lobster feast where we picked our lobster from the lagoon at Humuhumunukunukuapua’a (see picture above). But we'd never dared challenge a lobster dinner...until now.


The lobster roll at GT was unique...a meaty lobster salad in a perfectly toasted bun paired with a pile of fried onions. The dish was simple but featured the lobster flavor well and the fried onions were an added treat. We liked it so much that we decided we had to try and make it for ourselves.


Homemade recipe from Food Network Magazine
Note: Our local grocery store (Whole Foods) did not have whole live lobsters or top-split hot dog buns so we went with fresh lobster tails ($18.99 per tail) and made our own top-side buns by slicing the sides off some great etxra-wide hot dog buns. This recipe from Food Network Magazine is simple and easy to make. 


Both of these sandwiches would be a delight for any true lobster fan. And we have already talked about when we can next enjoy these treats. But in the end we enjoyed our homemade version a little better because it was just tail meat, it had larger chunks of meat, and it had just the leaves of celery and celery salt versus thin slices of celery stalk. All in all it was a great testament to lobster flavor but probably a low profit margin for a restaurant.  A butter toasted bun is also an essential component ("It's like having a side of melted butter without all the mess and necessary wet naps for your fingers" - Matt). Next time we have to make the fried onions as they were a great addition at GT.

Monday, January 2, 2012

New Year's Resolution: Burger Blog

It's a new year and for us that means a resurgence of our blog and our ongoing food challenge. Our resolution for this year is to keep updating this blog frequently thru 2012. We've had some great meals since our last post; THE FRENCH LAUNDRY, Sepia, The Bristol, Wayfare Tavern, Susan Feniger's Street, Nightwood, Graham Elliot...Just to name a few.

We thought we'd start off the year with one of our favorite foods (it's one of America's favorite foods too)...The Hamburger.

Some of you might know that Matt works for McDonald's and has a rather large affinity for burgers. That means, since he can't reveal any trade secrets, we can't challenge any McDonald's classics like the Big Mac or Quarter Pounder with Cheese. But that doesn't mean that we haven't been to a TON of other burger joints in search of the perfect hamburger. We've been to a number of places in Chicago such as Burger Bar, Custom House, Duchamp but recently Matt read an article about the 12 burger chains to watch in 2012 (http://www.burgerbusiness.com/?p=8852).

Since we were going to be in LA for Christmas this year to spend the holidays with the Campodonicos (Michele's fam) we decided to take one afternoon, head down to Hollywood and try Stout Burgers & Beers.

We got the Imperialist (Aged Cheddar, Ketchup, Mustard Relish, Roasted Tomatoes) and the Six Weeker (Brie, Fig Jam, Arugula, Carmelized Onions). Both burgers were really good. The Imperialist was more traditional, with a really nice addition of roasted tomatoes. The Six Weeker was definitely more unique and played up on sweet, salty, sour notes and we really liked the addition of brie.

We decided that when we got home we were going to resurrect the blog and create our version of the Six Weeker. So today 1/2/12 amidst a full day of college football bowl mania we put together our version of this delicious creation.

M&M's Six Weeker
80/20 Ground Beef (1/3lb per patty)
Your Favorite Hamburger Bun (We used Gonnella)
Brie (2 thin slices per burger)
Fig Jam (Recipe Below)
Baby Greens
Carmelized Onions


Fig Jam
This was a bit of an enigma for us as our local grocery store did not have fig jam. We had some dulce to higo (Ecuadorian candied figs) in the fridge so we chopped some of the figs up, tossed them into a small frying pan and combined them with:

  • 2 tablespoons of Dijon Mustard
  • 2 tablespoons of Aged Balsamic
  • Dash of Sherry Wine
  • Salt and Pepper to taste

Cook all ingredients until syrupy and jam like.

Six Weeker Instructions
While making the fig jam, we carmelized the onions (note this takes 30-40 minutes in order to get a rich brown color and enhanced flavor). After the jam and onions were complete, we set them both aside while we began to cook the burgers. First, butter and toast your hamburger buns on your grill or grill pan (it is winter after all in the Chi). Once lightly toasted, grill your hamburgers to your desired temperature and with 30-45 seconds left add 2 slices of brie to begin melting. After all components are complete this is the proper way to build the burger:

  1. Spread Fig Jam on Bottom Bun
  2. Add Burger covered in Brie on to Bottom Bun
  3. Spread carmelized onions on the Top Bun
  4. Add a few baby greens to Top Bun
  5. Place Top Bun (with carmelized onions and greens) to burger and bottom bun
  6. ENJOY!

THE RESULT: This was an incredibly close call as our burger was REALLY REALLY good. It is hard to go wrong either way but since we are the judges we'll give our version the nod to start 2012 off right!

However, this won't be our last burger challenge of the year and we will be on the look out for other great burger showdowns in 2012.

Sunday, September 18, 2011

Bon Appetit...French Bistro Cooking at Home

After two straight ND football filled weekends and in an attempt to change the routine (and the losing streak), we decided to take a cooking class at The Wooden Spoon. We took a French Market cooking class and learned how to make some amazing dishes including Tomato and Blue Cheese Tart, Flat Iron Steak and Caramelized Shallots with Herb Butter, Lentil Salad, Potato Dauphinoise, and a free form seasonal fruit tart with ice cream. We enjoyed every minute of the cooking class despite us both cutting ourselves on a shotty mandoline and I (its Michi here) loved seeing Matt in an apron for once.

With the familia coming over for dinner and a wine tasting (prep for our Napa trip in about 3 weeks) on Sunday, we decided to try out a recipe from the cooking class as well as add to the french repertoire. We ended up making the tomato and blue cheese tart and a homemade french onion soup. Everyone loved the tart and soup (despite our slight error on the tart shell, it puffed up to a small basketball in the oven). We are excited to continue to add to our global culinary adventures and hope you might enjoy these recipes too.

Tomato & Blue Cheese Tart (courtesy of The Wooden Spoon and Chef Rose)
Puff Pastry (frozen puff pastry thawed according to package directions)
4-6oz of blue cheese (room temp) [Note the original recipe called for 6oz but we ended up only using 4oz or so]
2tbsp half and half
2-3 tomatoes
freshly group pepper
fresh  thyme minced (about 6 sprigs)
1 tsp extra virgin olive oil

Heat oven to 400 degrees. On a floured surface, roll out the puff pastry to about 1/4-in thick and 10 1/2 inch in diameter. Transfer to a 9-inch tart pan and pat puff pastry into the bottom and sides and trim the edges so it's even with the rim. Place tart pan into freezer for 15 minutes.

In a small bowl, crumble the blue cheese and mash with half and half until a spreadable consistency but still has some lumps.

Slice tomatoes 1/4 inch thick and blot with paper towels to remove excess moisture.

Remove pastry from feezer, pierce the base of the shell with a fork to avoid puffing of the shell (we came to realize this VERY quickly) and bake until light golden brown (20 min). Remove from oven and cool for 10-15 minutes.

Spread blue cheese mixture in shell and then layer with tomatoes. Sprinkle with pepper and thyme and drizzle with olive oil.

Bake tart until golden brown and tomatoes collapse (10-15 minutes). Transfer to cooling rack and let stand for 20-30 minutes. Cut into wedges and serve warm or room temp.

French Onion Soup (courtesy of Tyler Florence - Ultimate Bistro on Food Network)
  • 1/2 cup unsalted butter
  • 4 onions, sliced
  • 2 garlic cloves, chopped
  • 2 bay leaves
  • 2 fresh thyme sprigs
  • Kosher salt and freshly ground black pepper
  • 1 cup red wine, about 1/2 bottle
  • 3 tablespoons Madera Wine (my addition)
  • 3 heaping tablespoons all-purpose flour
  • 2 quarts beef broth
  • 1 baguette, sliced
  • 1/2 pound grated Gruyere
Melt the stick of butter in a large pot over medium heat. Add the onions, garlic, bay leaves, thyme, and salt and pepper and cook until the onions are very soft and caramelized, about 25 minutes (REALLY it was about an hour). Add the wine, bring to a boil, reduce the heat and simmer until the wine has evaporated and the onions are dry, about 5 minutes. Discard the bay leaves and thyme sprigs. Dust the onions with the flour and give them a stir. Turn the heat down to medium low so the flour doesn't burn, and cook for 10 minutes to cook out the raw flour taste. Now add the madera wine and beef broth, bring the soup back to a simmer, and cook for 10 minutes. Season, to taste, with salt and pepper.
When you're ready to eat, preheat the broiler. Arrange the baguette slices on a baking sheet in a single layer. Sprinkle the slices with the Gruyere and broil until bubbly and golden brown, 3 to 5 minutes.
Ladle the soup in bowls and float several of the Gruyere croutons on top.

Sunday, September 11, 2011

Football Candy Cookie

As we welcomed back the NFL this weekend, we also made the journey down to Ann Arbor, Michigan again, to watch Notre Dame battle Michigan in their annual College Football contest. If you haven't heard about this game (consider yourself lucky), we will not be discussing or remembering it here. Needless to say, we needed some cheering up on Sunday. The Chicago Bears (30-12 winners over the Atlanta Falcons) helped our melancholy, but we needed something a bit sweeter than that.

Now, we have this habit of making giant cookies (yes I said giant cookies, don't judge, they are delicious). We decided that was just what we needed, but discovered to our dismay, that we didn't have any chocolate chips to make our patented giant chocolate chip cookie. We did however have a giant bag of candy from Costco (only like 15 bucks, great deal), leftover from our end of summer fiesta  which had filled our bull piƱata. We thought we'd try making a cookie with the mini candy bars. We know this isn't our traditional blog post, as far as we know no one has made a cookie like this before, but it was SO GOOD that we had to write about it (and also get the blog going again). If your intrigued by the candy cookie idea, see how we made this creation below:

Football Candy Cookie
Ingredients for your favorite chocolate cookie recipe just omit chocolate chips
1 1/4 cups of chopped chocolate candy (we used a mixture of snickers, baby ruth, milky way regular and midnight)

Make your favorite chocolate chip cookie recipe but omit the chocolate chips. Once the batter is made, add 1 cup of your favorite chocolate candy (about 16 mini chocolate candy bars) chopped in small chunks. Stir until chocolate candy pieces are well incorporated into the batter. Then bake as a normal chocolate chip cookie. About half way through cooking, add remaining chopped chocolate candy on top. Finish baking until cookie is lightly golden brown. Let cool for at least 5 min before eating as carmel filling in candies is HOT.

We have a lot of foodie activities coming up in the fall, so we plan to jumpstart the blog again. So stay tuned in the coming weeks for more M&M food adventures and creations.